| Head southwest on Market Street | 35 m |
| Continue right onto Angel Row | 100 m |
| Continue slightly left onto Mount Street | 100 m |
| Turn left onto Maid Marian Way | 500 m |
| Continue onto Greyfriar Gate | 150 m |
| Keep left onto Wilford Street (A6008) | 150 m |
| Continue onto Wilford Road (A6008) | 200 m |
| Make a slight right onto Queen's Drive (A453) | 900 m |
| Keep left onto Queen's Drive (A453) | 150 m |
| Continue onto Queens Drive (A453) | 1.5 km |
| Enter the traffic circle and take the 1st exit | 10 m |
| Exit the traffic circle | 300 m |
| Merge right onto A52 | 450 m |
| Keep right onto Remembrance Way (A453) | 1.5 km |
| Enter Farnbourgh Road Roundabout and take the 2nd exit onto Remembrance Way (A453) | 55 m |
| Exit the traffic circle onto Remembrance Way (A453) | 1.5 km |
| Enter Crusader Roundabout and take the 2nd exit onto Remembrance Way (A453) | 45 m |
| Exit the traffic circle onto Remembrance Way (A453) | 1 km |
| Enter Mill Hill Roundabout and take the 2nd exit onto Remembrance Way (A453) | 80 m |
| Exit the traffic circle onto Remembrance Way (A453) | 9 km |
| Keep right at the fork | 80 m |
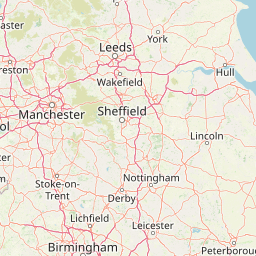
| Keep left onto A50 | 8 km |
| Keep right onto A50 | 25 km |
| Enter the traffic circle and take the 2nd exit onto A50 | 90 m |
| Exit the traffic circle onto A50 | 8 km |
| Enter the traffic circle and take the 2nd exit onto A50 | 80 m |
| Exit the traffic circle onto A50 | 1.5 km |
| Enter McDonalds Roundabout and take the 2nd exit onto A50 | 50 m |
| Exit the traffic circle onto A50 | 15 km |
| Enter the traffic circle and take the 1st exit onto A50 | 10 m |
| Exit the traffic circle onto A50 | 2 km |
| Take the ramp on the left towards A521: Blythe Bridge | 250 m |
| Enter the traffic circle and take the 2nd exit | 70 m |
| Exit the traffic circle | 300 m |
| Merge right onto Uttoxeter Road (A50) | 4.5 km |
| Take the ramp on the left | 400 m |
| Enter Heron Cross Roundabout and take the 2nd exit onto Victoria Place Link (A50) | 150 m |
| Exit the traffic circle onto Victoria Place Link (A50) | 700 m |
| Enter the traffic circle and take the 1st exit onto King Street (A50) | 9 m |
| Exit the traffic circle onto King Street (A50) | 250 m |
| Enter the traffic circle and take the 2nd exit onto City Road (A5007) | 25 m |
| Exit the traffic circle onto City Road (A5007) | 1 km |
| Enter the traffic circle and take the 1st exit onto City Road (A5007) | 9 m |
| Exit the traffic circle onto City Road (A5007) | 250 m |
| Take the ramp | 250 m |
| Keep right at the fork | 200 m |
| Merge right onto Queensway (A500) | 15 km |
| Enter Barthomley Interchange and take the 2nd exit onto A500 | 150 m |
| Exit the traffic circle onto A500 | 3.5 km |
| Enter Meremoor Moss Roundabout and take the 2nd exit onto Shavington Bypass (A500) | 70 m |
| Exit the traffic circle onto Shavington Bypass (A500) | 2 km |
| Enter Weston Gate Roundabout and take the 1st exit onto Shavington Bypass (A500) | 100 m |
| Exit the traffic circle onto Shavington Bypass (A500) | 2 km |
| Enter the traffic circle and take the 2nd exit onto Shavington Bypass (A500) | 45 m |
| Exit the traffic circle onto Shavington Bypass (A500) | 3.5 km |
| Enter Cheerbrook Roundabout and take the 3rd exit onto Nantwich Bypass (A51) | 100 m |
| Exit the traffic circle onto Nantwich Bypass (A51) | 900 m |
| Enter Peacock Roundabout and take the 2nd exit onto Nantwich Bypass (A51) | 50 m |
| Exit the traffic circle onto Nantwich Bypass (A51) | 1.5 km |
| Enter Alvaston Roundabout and take the 2nd exit onto Nantwich Bypass (A51) | 40 m |
| Exit the traffic circle onto Nantwich Bypass (A51) | 800 m |
| Enter Reaseheath Roundabout and take the 2nd exit onto Millstone Lane (A51) | 70 m |
| Exit the traffic circle onto Millstone Lane (A51) | 2.5 km |
| Turn right onto Chester Road (A51) | 3.5 km |
| Continue onto Nantwich Road (A51) | 800 m |
| Enter the traffic circle and take the 2nd exit onto Nantwich Road (A51) | 40 m |
| Exit the traffic circle onto Nantwich Road (A51) | 7 km |
| Go straight onto Tarporley Bypass (A49) | 2 km |
| Enter the traffic circle and take the 1st exit onto Rode Street (A51) | 8 m |
| Exit the traffic circle onto Rode Street (A51) | 1 km |
| Continue onto High Street (A51) | 1.5 km |
| Continue onto Duddon Road (A51) | 1 km |
| Continue onto Tarporley Road (A51) | 2 km |
| Continue onto Tarvin By-Pass (A51) | 2 km |
| Make a slight left onto Tarvin Bypass (A51) | 50 m |
| Enter Tarvin Roundabout and take the 1st exit onto Holme Street (A51) | 8 m |
| Exit the traffic circle onto Holme Street (A51) | 1 km |
| Continue onto Tarvin Road (A51) | 3.5 km |
| Enter Vicars Cross and take the 1st exit towards A55: NORTH WALES | 15 m |
| Exit the traffic circle towards A55: NORTH WALES | 400 m |
| Merge right towards A55: NORTH WALES | 10 km |
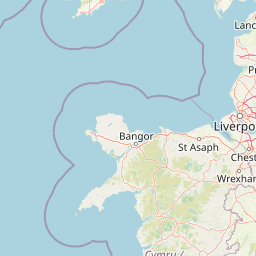
| Continue onto Gwibffordd Gogledd Cymru / North Wales Expressway (A55) | 70 km |
| Enter Puffin Roundabout and take the 2nd exit onto Gwibffordd Gogledd Cymru / North Wales Expressway (A55) | 40 m |
| Exit the traffic circle onto Gwibffordd Gogledd Cymru / North Wales Expressway (A55) | 4.5 km |
| Enter Llanfairfechan Roundabout and take the 2nd exit onto Gwibffordd Gogledd Cymru / North Wales Expressway (A55) | 40 m |
| Exit the traffic circle onto Gwibffordd Gogledd Cymru / North Wales Expressway (A55) | 50 km |
| Enter Kingsland Roundabout and take the 3rd exit onto Victoria Road (A55) | 80 m |
| Exit the traffic circle onto Victoria Road (A55) | 200 m |
| Turn right onto London Road (A55) | 150 m |
| Turn left onto Llanfawr Road (A55) | 100 m |
| Enter the traffic circle and take the 1st exit towards Ferry | 25 m |
| Exit the traffic circle towards Ferry | 40 m |
| Make a slight left | 1 km |
| Keep right at the fork | 500 m |
| Turn right | 200 m |
| Take the ferry Dublin - Holyhead | 100 km |
| Continue straight | 200 m |
| Make a slight left | 20 m |
| Keep right at the fork | 250 m |
| Turn left onto Tolka Quay Road | 300 m |
| Enter the traffic circle and take the 2nd exit onto Tolka Quay Road | 25 m |
| Exit the traffic circle onto Tolka Quay Road | 800 m |
| Enter the traffic circle and take the 1st exit onto Tolka Quay Road | 15 m |
| Exit the traffic circle onto Tolka Quay Road | 200 m |
| Turn right | 200 m |
| Continue left onto Promenade Road | 500 m |
| Take the ramp on the right towards M50 | 200 m |
| Merge right onto Dublin Tunnel (M50) | 60 m |
| Keep right onto Dublin Tunnel (M50) | 5 km |
| Continue onto Airport Motorway (M50) | 1.5 km |
| Keep right onto Airport Motorway (M1) | 2 km |
| Keep right onto Cloghran Lissenhall Motorway (M1) | 7 km |
| Continue onto Lissenhall Balbriggan Motorway (M1) | 9 km |
| Continue onto Balbriggan Bypass (M1) | 9 km |
| Continue onto Drogheda Bypass (M1) | 20 km |
| Continue onto Dunleer Bypass (M1) | 6 km |
| Continue onto Dunleer Dundalk Motorway (M1) | 15 km |
| Continue onto Dundalk Western Bypass (M1) | 10 km |
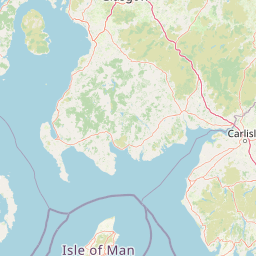
| Continue onto Newry Dundalk Link Road (N1) | 9 km |
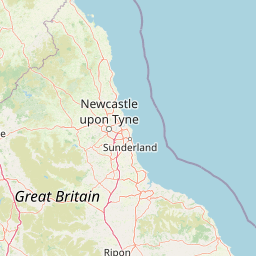
| Continue onto Dublin Road (A1) | 15 km |
| Continue onto Belfast Road (A1) | 35 km |
| Enter Hillsborough Roundabout and take the 1st exit onto Hillsborough Road (A1) | 45 m |
| Exit the traffic circle onto Hillsborough Road (A1) | 2 km |
| Enter the traffic circle and take the 2nd exit onto Hillsborough Road (A1) | 55 m |
| Exit the traffic circle onto Hillsborough Road (A1) | 400 m |
| Enter the traffic circle and take the 1st exit towards M1: Belfast | 60 m |
| Exit the traffic circle towards M1: Belfast | 700 m |
| Merge right onto M1 | 15 km |
| Continue onto Westlink (A12) | 800 m |
| Take the ramp on the left | 300 m |
| Keep right at the fork | 45 m |
| Turn right onto Grosvenor Road (B38) | 550 m |
| Turn left onto Fisherwick Place (A1) | 100 m |
| Keep right onto College Square East (A1) | 45 m |
| Turn right onto Wellington Place (A1) | 250 m |
| Continue onto Donegall Square North (A1) | 100 m |
| Turn right to stay on Donegall Square East (A1) | 150 m |
| Turn right to stay on Donegall Square South (A20) | 60 m |
| You have arrived at your destination, on the right | 0 m |


 Connectez-vous avec Google