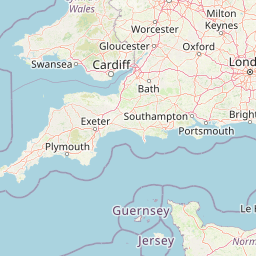
| Head southwest on Church Street Roundabout | 70 m |
| Exit the traffic circle onto Mile End Road (A3) | 400 m |
| Go straight onto M275 | 3.5 km |
| Take exit 12 towards M27: Southampton | 300 m |
| Merge right onto M27 | 30 km |
| Take the ramp on the left towards M3 | 15 km |
| Take the ramp on the left towards A34 | 400 m |
| Enter Winnall Interchange and take the 2nd exit onto Winchester Bypass (A34) | 100 m |
| Exit the traffic circle onto Winchester Bypass (A34) | 100 km |
| Enter Wendlebury Interchange and take the 1st exit towards M40: Northampton | 35 m |
| Exit the traffic circle towards M40: Northampton | 8 km |
| Take exit 10 on the left towards B430: Brackley | 600 m |
| Enter Ardley Roundabout and take the 2nd exit onto A43 | 100 m |
| Exit the traffic circle onto A43 | 300 m |
| Keep left onto A43 | 350 m |
| Keep left onto A43 | 700 m |
| Enter Baynard's Green Roundabout and take the 2nd exit onto A43 | 70 m |
| Exit the traffic circle onto A43 | 5 km |
| Enter Barleymow Roundabout and take the 2nd exit onto A43 | 45 m |
| Exit the traffic circle onto A43 | 2 km |
| Enter the traffic circle and take the 2nd exit onto A43 | 45 m |
| Exit the traffic circle onto A43 | 1 km |
| Keep right at the fork | 70 m |
| Keep left towards M1: Motorway M1 | 1.5 km |
| Enter the traffic circle and take the 2nd exit onto Brackley Bypass (A43) | 45 m |
| Exit the traffic circle onto Brackley Bypass (A43) | 1.5 km |
| Enter the traffic circle and take the 2nd exit onto A43 | 100 m |
| Exit the traffic circle onto A43 | 15 km |
| Enter Abthorpe Roundabout and take the 2nd exit onto A43 | 20 m |
| Exit the traffic circle onto A43 | 1.5 km |
| Enter Towcester Roundabout and take the 3rd exit onto A43 | 50 m |
| Exit the traffic circle onto A43 | 9 km |
| Keep left onto A43 | 400 m |
| Continue towards M1 | 450 m |
| Merge right onto M1 | 20 km |
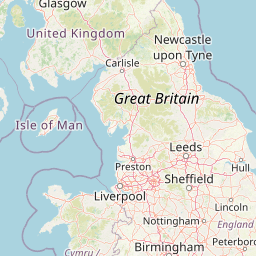
| Keep right onto M1 | 35 km |
| Keep right onto M1 | 90 km |
| Keep left onto M18 | 15 km |
| Take the ramp on the left onto M18 | 400 m |
| Keep left towards A1(M): The NORTH | 250 m |
| Continue onto Doncaster By-pass (A1(M)) | 500 m |
| Merge right onto Doncaster By-pass (A1(M)) | 10 km |
| Continue onto Doncaster Bypass (A1(M)) | 15 km |
| Keep right onto A1(M) | 55 km |
| Keep left towards A168: Thirsk | 2 km |
| Continue onto A168 | 10 km |
| Continue onto A19 | 40 km |
| Take the ramp onto A19 | 550 m |
| Keep right towards A1046: Haverton Hill | 100 m |
| Enter Portrack Interchange and take the 2nd exit towards The North | 100 m |
| Exit the traffic circle towards The North | 500 m |
| Merge right onto Fleet Bridge Road (A19) | 30 km |
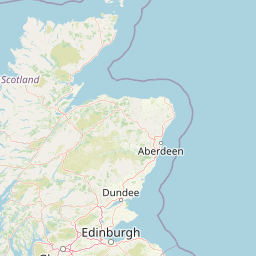
| Keep left towards Sunderland | 2.5 km |
| Enter Seaton Interchange and take the 1st exit onto Stockton Road (A1018) | 35 m |
| Exit the traffic circle onto Stockton Road (A1018) | 550 m |
| Enter Stockton Road and take the 3rd exit onto Saint Nazaire Way (A1018) | 90 m |
| Exit the traffic circle onto Saint Nazaire Way (A1018) | 400 m |
| Enter the traffic circle and take the 1st exit onto Saint Nazaire Way (A1018) | 45 m |
| Exit the traffic circle onto Saint Nazaire Way (A1018) | 350 m |
| Make a slight left onto St. Nazaire Way (A1018) | 35 m |
| Enter the traffic circle and take the 1st exit onto St. Nazaire Way (A1018) | 5 m |
| Exit the traffic circle onto St. Nazaire Way (A1018) | 1.5 km |
| Enter the traffic circle and take the 1st exit onto Salterfen Road (B1405) | 3 m |
| Exit the traffic circle onto Salterfen Road (B1405) | 150 m |
| Turn right onto Ryhope Road (B1522) | 1 km |
| Enter the traffic circle and take the 3rd exit onto Ryhope Road (B1522) | 45 m |
| Exit the traffic circle onto Ryhope Road (B1522) | 1.5 km |
| Continue onto Stockton Road (B1522) | 200 m |
| Make a sharp right to stay on Park Road (A1231) | 150 m |
| Make a slight left to stay on Park Road | 35 m |
| Turn left onto Burdon Road | 600 m |
| Turn right onto Athaneum Street | 40 m |
| Turn left | 70 m |
| You have arrived at your destination | 0 m |


 Connectez-vous avec Google